How to Center Clay on a Pottery Wheel for Beginners
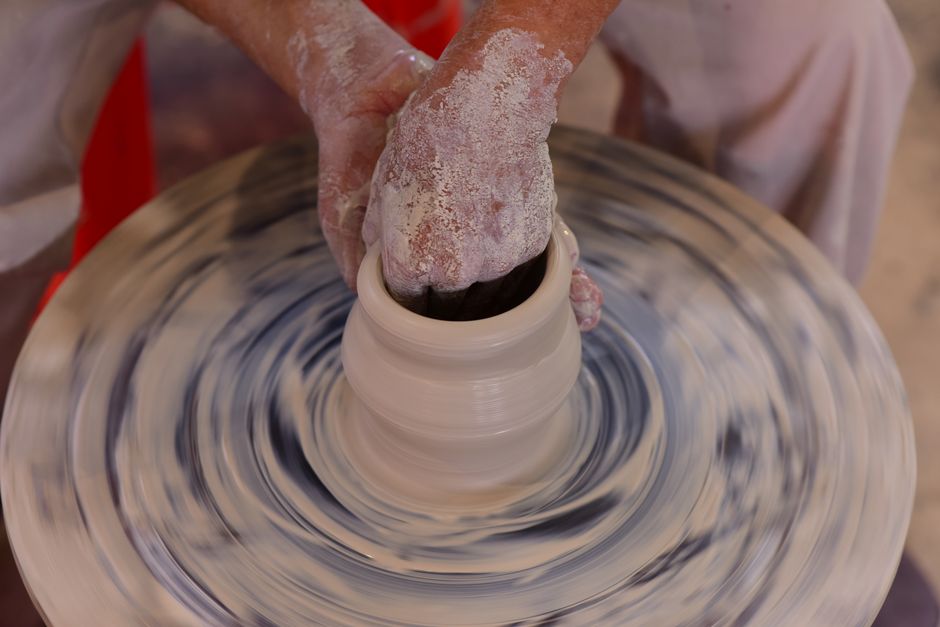
Centering clay on a pottery wheel is often described as the foundation of wheel throwing. For beginners, this step can feel frustrating and elusive, but it is a skill that can be learned with practice and understanding. The process involves aligning the particles of clay into a uniform, symmetrical mass that spins without wobbling. When done correctly, it sets the stage for creating forms that are balanced and consistent. This guide aims to break down the technique into clear, actionable steps, focusing on the physical principles and mindful adjustments that lead to success.
Before beginning, it is important to recognize that centering is not about force, but about control. The hands, body position, and wheel speed all work together to guide the clay into center. Many beginners press too hard or too little, resulting in lopsided cones or collapsed mounds. By understanding the role of each element—water, pressure, and timing—you can develop a reliable method. This article will walk you through the preparation, the technique, and common pitfalls, providing a mental framework that supports your practice.
Preparing Your Workspace and Clay
Before you even touch the clay, ensure your workspace is organized and your materials are ready. This preparation reduces interruptions and allows you to focus entirely on the task. You will need a bat or a wheel head, a sponge, a needle tool, and a small container of water. The clay should be wedged properly to remove air bubbles and ensure uniform consistency. Wedging also aligns the clay particles, which makes centering easier. A well-wedged ball of clay, about the size of your fist, is a good starting point for most beginners.
Moisture is a critical factor in centering. You want the clay to be slightly damp but not overly wet. If the clay is too dry, it will resist movement and crack; if too wet, it will become slippery and difficult to control. Keep a sponge nearby to wet your hands and the clay surface as needed, but avoid causing puddles. Too much water can make the clay slushy, compromising its structure. The goal is to maintain a smooth, even surface that allows your hands to glide without sticking.
Position yourself comfortably at the wheel. Sit close enough that your elbows can rest on your thighs for stability, with your back straight and shoulders relaxed. This grounded posture provides leverage and reduces fatigue. Your forearms should be parallel to the floor, and your hands should be ready to approach the clay with intention. Taking a moment to breathe and center yourself can also help you approach the task with patience.
The Step-by-Step Centering Process
Start the wheel at a moderate speed, around 800 to 1000 revolutions per minute for most clays. This speed is fast enough to create centrifugal force but slow enough for control. Place the ball of clay firmly onto the center of the bat or wheel head. If you are using a bat, ensure it is securely attached. With your hands slightly wet, press the clay down and forward to ensure it is firmly attached to the surface. This initial attachment prevents the clay from sliding off when you begin to shape it.
Once the wheel is spinning, begin the centering technique. Keep your elbows locked against your thighs and your hands on opposite sides of the clay, with your wrists straight and fingers together. Apply gentle, even pressure with the heels of your hands, pressing inward while also pushing downward slightly. The downward pressure helps seat the clay onto the bat, while the inward pressure reduces the wobble. As the clay comes into center, you will feel a smooth, consistent resistance under your hands. This sensation indicates that the clay is becoming symmetrical.
After a few seconds, cup your hands around the clay and use the heels of your palms to squeeze upward and inward, forming a cone about 5 to 8 centimeters tall. This cone shape helps align the clay particles and makes the next step easier. Then, with your hands still cupped, gently push the cone down to a squat shape, using the same steady pressure. This up-and-down motion, known as “coning,” helps to further align the clay and can be repeated several times to ensure thorough centering. Each time you cone, you are resetting the clay’s shape, which can correct minor imbalances.
Finally, use your fingers to shape the centered clay into a smooth, dome-like form. The ideal centered piece will not wobble, and your hands will feel no bumps or variations in resistance. Test the centering by holding your hands still and letting the clay spin. If you see any wobble, apply gentle adjustments with your hands to correct it. Once you are satisfied, you are ready to move on to opening and pulling the walls. Remember that centering is not a one-time event; it is an ongoing process that may require touch-ups as you work.
Common Mistakes and How to Avoid Them
Many beginners encounter challenges that can be easily addressed with attention to technique. One frequent issue is using too much water, which can make the clay too soft and prone to collapse. Instead, use water sparingly, focusing on keeping your hands and the clay surface just moist enough to reduce friction. If the clay becomes too wet, let it sit for a moment to dry slightly, or remove excess water with a sponge.
Another mistake is applying uneven pressure. When you press harder on one side than the other, the clay moves away from that side, increasing the wobble. To avoid this, keep both hands symmetrical and use your body weight to apply equal pressure. Your palms should be aligned at the same angle, and your fingers should be relaxed. Think of your hands as a mold that guides the clay into a uniform mass, rather than as tools that force it.
Impatience is also a common obstacle. Centering takes time, and rushing can lead to frustration and poor results. Beginners may expect the clay to center in a few seconds, but it often takes several minutes of steady pressure. If the clay starts to lean, you can use the cone method to reset it. Do not be discouraged by setbacks; each attempt provides valuable feedback. Over time, your muscle memory will develop, and the process will become more natural.
Additionally, check your wheel speed. If it is too slow, the centrifugal force is insufficient to help center the clay; if too fast, the clay may become unstable. Adjust the speed within the recommended range and observe the behavior of the clay. A consistent, controlled speed is better than fluctuating speeds. Keep your eye level with the clay to observe its movement from all angles, but rely mainly on the tactile feedback from your hands.
Troubleshooting and Refining Your Technique
Even with careful attention, you may encounter specific issues that require adjustment. If the clay appears to be centered during slow spinning but wobbles at higher speeds, it may not be fully centered. Increase the wheel speed and re-check the centering, making subtle corrections as needed. If the clay becomes off-center while you are working, stop and re-center it before proceeding. It is better to pause and fix the issue than to continue with an unstable base.
Different types of clay have varying levels of plasticity and moisture content, which can affect how they center. For example, coarse clays may resist smooth centering, while very plastic clays may be sticky. Adjust your water usage and pressure accordingly. If the clay seems dry and crumbly, add a little water and knead it before trying again. If it is too soft, allow it to stiffen slightly before throwing.
Your hands may become fatigued during practice, leading to a loss of control. Take short breaks and stretch your fingers and wrists. Maintaining a relaxed grip is more effective than a tight one. Remember that centering is a skill that improves with repetition, and every session contributes to your proficiency. Keeping a journal of your observations can help you track progress and identify patterns.
A useful mantra for centering is “let the clay come to you.” This reminds you to work with the clay’s natural properties rather than fight against them. By staying patient and observant, you can develop a feel for the process.
Finally, consider seeking feedback from more experienced potters or watching demonstrations. Observing the subtle movements of the hands and body can provide insights that descriptions cannot capture. Practice consistently, but do not overdo it; your muscles need time to adapt. With time, centering will become a quick, almost automatic step in your throwing routine, allowing you to focus on the creative possibilities of the wheel.